Friday 30 December 2011

The Bottle Caps Story

Each bottle cap has its own life, just like me and you.

But when every bottle cap comes together, 
they can form a significant purpose to save our home.


Pollution is EVERYWHERE.


Drive less, use the public transport.


Love the nature, do not kill the trees.


Do your part by not smoking.
Especially if you are sick and underaged.
Not only does it affect your health, it affects your loved ones and Mother Earth.


Everyone's on Social Media.
Spread the message, Share the love.
Save the Earth, Save yourself.


Be kind to animals.
They're just like me and you, 
they need tender love and care.


Buy eco-friendly furniture for your home. 


Life is vibrant, it's full of colours.
Make it brilliant, less of duller.


 Together, we can all live happily ever after... :)
Let 2012 be a greener year for you and me!


Last but not least, HAPPY HOLIDAYS!

Friday 23 December 2011

DIY Christmas Wreath

Not sure what to do with all your unwanted plastic bags? Now it's a good time to put it into good use for this  Festive Season!!!

Presenting to you...

THE DIY CHRISTMAS WREATH!
The following tutorial will teach you how to make a really simple and super affordable yet decorative Christmas wreath and it is a great activity that you could do it with your family and friends :)
All you will need is: 
  1. A pair of scissors
  2. A wire hanger
  3. Plenty of small plastic bags - You definitely need more than 10 plastic bags per colour (Green and red will be a preferred colour for this season but since we had red and transparent ones, we made do with this! - Think Santa Claus costume, candy cane... yes? :D) 
P.S. If you do not have enough plastic bags for a certain colour, be creative! A rainbow christmas wreath looks awesome too ;)


    OK LET'S GO!

    Step 1: Get a hanger and bend it into a round shape. (It will look like a diamond shape the first time you stretch it out but don't worry, it'll look round after a few bends)

    Step 2: Cut the platic bags into 3 strips


    Step 3: Tie a knot around the hanger.


    Step 4: Tie the plastic bags in alternate colours (Red, transparent, red, transparent...) and push the ribbons closely together with the other knots towards the hanger hook.


    Who says you can't have some fun and laughter doing this? :)

    This is how it'll look like after tying all the knots (If you used big plastic bags like us) and we know it doesn't look like a Christmas wreath YET.

    But fret not! Continue reading and you'll see a super adorable Christmas wreath =D

    Step 5:  Trim both ends until you get a nice round shape in the middle and on the outside.

    Step 6: Massage the plastic bags until you get a messy and fluffy look to create fullness.

    HOHOHO AND YOU'RE DONE!!! HOW EASY WAS THAT?

    Alternatively.. you may get a cheap ribbon at any DIY stores or you could even make it yourself!


    Here are some places that you could hang your Christmas wreath...


    Hope you guys have an AWESOME Christmas this year! 2011 is coming to an end so do enjoy your last 6 days of 2011 with your loved ones!

    MERRY CHRISTMAS Y'ALL!!!!


    P.S: Don't forget to keep having that eco-friendly spirit and reduce, reuse and recycle! 

    Friday 16 December 2011

    Every effort counts.

    Hey guys! Did you notice the change in our header?
    We came out with a new Christmas theme just for this festive season!

    From our last blog post, we have told you about 5 amazing facts of plastics.
    Now we'll show you how much you can save just by starting small on your part. :)


    (I bet some of you are guilty of using more than 1 straw!)


    You can bring your own bottles when you are out instead of buying mineral bottles.
    This way, you can not only save plastic, you can also save money and water at the same time!


    P.S. Many thanks and credits to the 7-Eleven Auntie... :)

    Saturday 3 December 2011

    1, 2, 3, 4.. 5 FACTS!


    Do you know...
     
    • Who invented plastics?
    • How much energy you can conserve with one plastic bottle?
    • How long it takes for plastics to decompose?
    • Why are there 3 Kian Wei(s) in the video?
    • Why China, Ireland, Australia and Bangladesh gets a 'way to go' from us?
     
    Check out our video to find out more! Enjoy :)

    Saturday 26 November 2011

    Straw Heart Hair Pin


    Always late for school and worry about not having enough time to look good?
    Well fret not, WE HAVE A SOLUTION FOR YOU!
    Remember the times when folding straw hearts were "IN"??
    Not only that, you can reuse at the same time!

    Presenting to you....

      The Straw heart hair pin!

    The main techniques you have to note when doing the straw heart  is folding over and tucking under/folding behind. Remember to do it tightly!

    The following numbers may seem confusing but just remember to label numbers at the ends of the straws and take a step at a time. Be patient and practise, practise, practise.

    Ready? Here goes!

    All you will need is:


    1. A pair of scissors

    2. A bobby pin

    3. 2 straws


      Step 1: Flatten out the straws (the flatter it is, the easier it is to fold)
      Step 2: Put straw below another and form a "V" shape
      Step 3: Fold '4' forward to make it parallel to '2'


      Step 4:  Fold '3' over '4' and tuck under '2'
      Step 5: Fold '4' over '2' and '3' and tuck under '1'
      Step 6: Fold '2' behind '3' and bring over '1'


      Step 7: Fold '3' behind '1' and '2' and over '4'
      Step 8: Fold '1' over '2' and tuck under '4'
      Step 9: Fold '2' over '1' and '4' and tuck under '3'
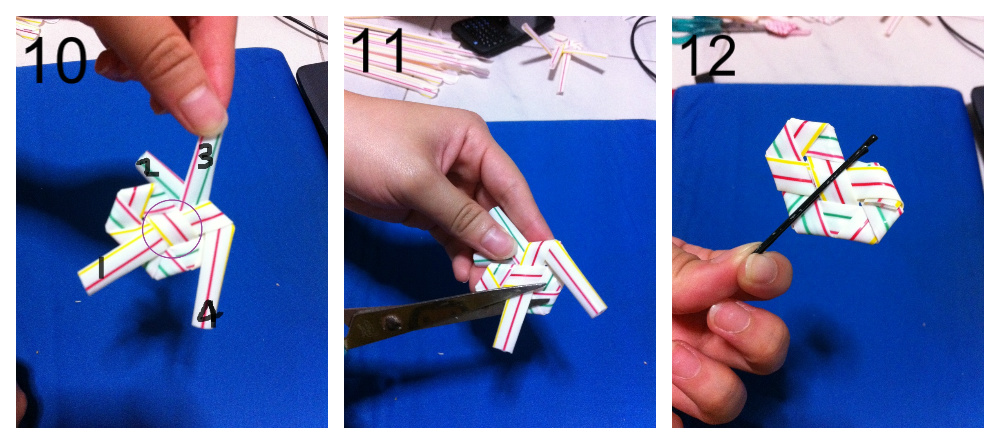


      Step 10: Fold '1' downwards and tuck into the circled area
      Step 11: Cut away stray ends
      Step 12: Slot bobby pin in (you could slot it vertically as seen in the picture, or slot it horizontally too!)

      Tadah! You're done!

      On a lighter note, here are some other ways you can use your straw heart hair pin :)
      Hairpin

      Necklace Pendant

      Lapel Pin


      Or, you can also use it as a Paper Clip.

      Now, you have no reasons to mess up your notes and look good in a short period of time!


      Hope you guys enjoyed this tutorial on making straw heart pins and that it'll inspire you to make other creative hairpins besides using straws :)

      P.S. Check this out!  http://www.skitzone.com/2010/cool-drinking-straw-arts/
      Didn't know that plastic drinking straws can be made into these cute little things.